Cracked Firebricks: Should You Replace It?
Have you noticed some cracks in your kiln's firebricks and are wondering if they mean trouble? You’re not alone. These hardworking bricks deal with extreme temperatures during every firing, so some wear and tear is expected. But when does a slight crack translate to its time to replace a brick, and when can you just keep firing as usual? Let’s walk through what’s normal, what’s not, and what to do about it.
Why Do Firebricks Crack?
Firebricks crack due to three main reasons: thermal stress, physical impact, and firing contaminants. Below, you’ll learn a little more about each reason.
Thermal Stress
Cracks most often show up due to repeated heating and cooling cycles. Every time you fire your kiln, the bricks expand with heat. As they cool, they contract. This thermal cycling can lead to visible hairline cracks over time, usually after 50 to 100 firings. If you are firing at high temperatures, this can happen much sooner.
Physical Impact
Bumping shelves or artwork against the brick when loading or unloading can cause gouges, chips, or deeper cracks. It’s easy to do, especially if you’re in a rush or working with heavy pieces.
Firing Contaminants
Sometimes, the materials you fire can contribute to brick damage. Corrosive vapors from certain glazes, enamels, metallic lusters, and paints, as well as unexpected explosions from improperly prepared pieces, can cause fractures or surface erosion.
Types of Cracks and What They Mean
Hairline Cracks
These are shallow, less than 1mm wide, and often cosmetic. Think of them like wrinkles—a sign of regular use, not a red flag. As long as they don’t reach the outer shell or have significant crumbling, they’re generally safe to ignore.
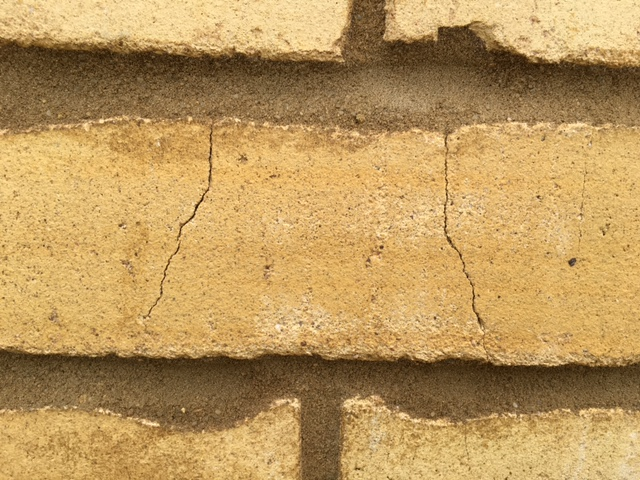
Credit: Bespoke Brick
Structural Cracks
If the crack is wider than 2mm (about the thickness of a US quarter), or if the brick looks deformed or begins crumbling, that’s a sign of a deeper issue. These cracks can reduce your kiln’s efficiency and may lead to hot spots or safety concerns.
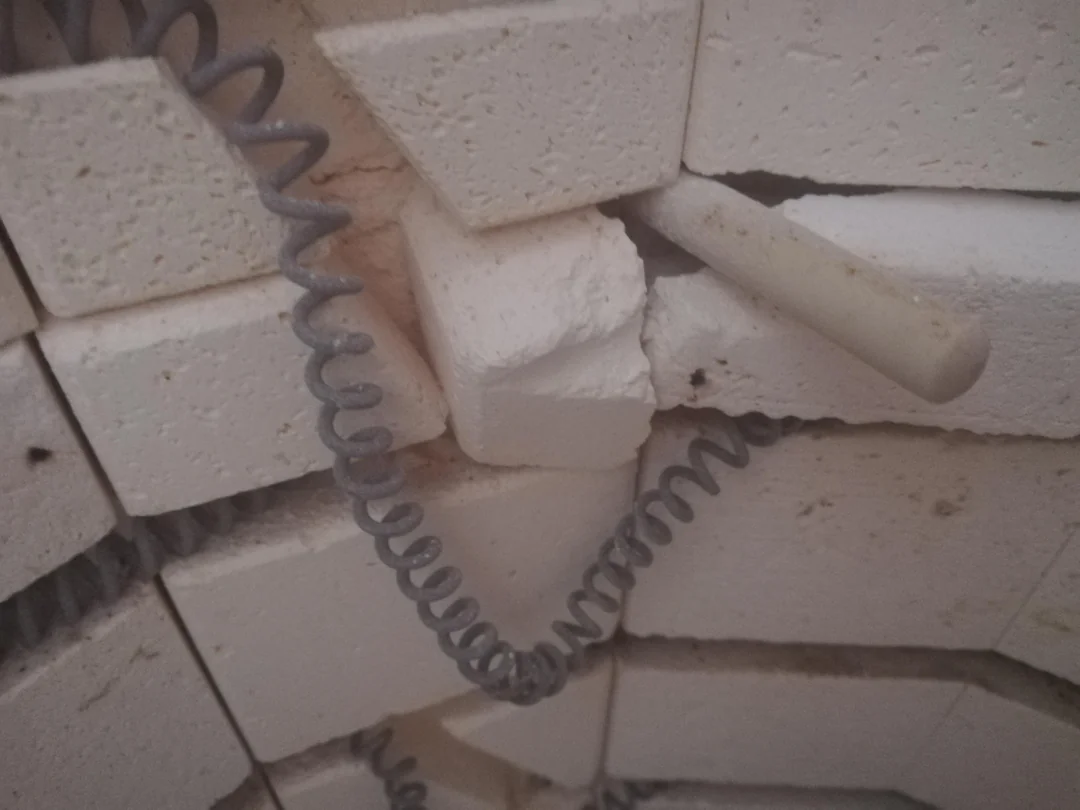
Credit: r/Ceramics
How to Assess the Severity
Once you’ve spotted a crack, the next step is figuring out what it means for your kiln’s performance and safety. Not every crack calls for action, but some do. Here’s how to tell if you’re good to go or if it’s time for a closer inspection.
When It’s Okay to Keep Using Your Kiln
-
Cracks that stay under 1mm wide
-
Fissures that don’t go all the way through the brick (You might not actually be able to see this.)
-
Damage that hasn’t gotten worse after 5 to 10 firings
If you’re seeing stable, minor cracks that haven’t changed in a while, keep an eye on them but don’t stress. Routine inspections are your best friend here.
When It’s Time to Replace
-
Cracks wider than 3mm
-
Chunks breaking off
-
Cracks that will not support heating elements or reach the metal shell
-
Loose bricks or shifting during operation
If any of these issues show up, it’s time for a replacement. Continuing to fire with damaged bricks can lead to inconsistent results or even damage your kiln.
Repairing vs. Replacing
Once you know the severity of the crack, you’re faced with a choice: patch it up or swap it out. Here’s a quick breakdown to help you weigh your options.
When is Reparing the Better Option for Your Kiln?
For small cracks (under 2mm), a high-temp patching compound like pyrolyte or another kiln-safe refractory cement like mortar can do the trick. Just make sure your kiln is completely cool and clean before applying anything. Let the patch cure per the manufacturer’s instructions (usually 24-48 hours) before firing again.
When Replacement Is Better
Repairs won’t be enough if bricks break apart or shift during firings. In these cases, replace the damaged brick entirely. Always use the correct type of brick for your kiln model—sourcing directly from your kiln manufacturer ensures you get a compatible part.
To install:
-
Make sure the kiln is unplugged and completely cool.
-
Remove the broken brick gently to avoid disturbing the surrounding area.
-
Vacuum out dust or debris.
-
Use refractory mortar to set the new brick with a 1-2mm bond line.
-
Allow 72 hours (or the recommended time) for the mortar to cure before firing.
Preventing Future Cracks
Want to make your firebricks last longer? A little preventative care goes a long way. From firing strategies to cleaning tips, here’s how to keep those bricks in top shape and reduce the chance of future cracks.
Smart Firing Practices
Use slower heating and cooling ramp rates when possible. A 150-200°F per hour increase (or decrease) helps reduce thermal stress. Don’t open the kiln until it’s below 150°F. If the damage seems uneven or concentrated in one area, consider whether your kiln’s location might be affecting heat distribution or airflow.
Handle with Care
Avoid bumping shelves or pieces against the walls. Be gentle when loading and unloading.
Regular Checkups
If you fire frequently, check your bricks monthly. For occasional use, inspect before each firing. Snap photos of any cracks so you can compare over time.
Clean and Coat
Brush away debris after every few firings. Always apply kiln wash to brick kiln floors and shelves to prevent glaze drips from embedding into the brick..
Know When to Act on Cracks
Cracks in your kiln’s firebricks don’t have to be a cause for alarm. In fact, many are perfectly normal. The key is knowing what kind of damage to watch for and taking action when needed. With regular inspections and thoughtful maintenance, you can keep your kiln in great shape for years to come.
Still not sure what’s going on? Our complete Kiln Troubleshooting Guide walks you through common issues and what they mean.


Leave a comment