

FrogBlog

How to Clean Debris Behind Your Kiln Controller Screen: A Step-by-Step Guide
Noticed dust or debris trapped behind your kiln controller screen? Learn how to safely clean the protective screen, inspect for damage, and reassemble your controller with this simple step-by-step guide. Discover when a quick cleaning is enough and when a replacement may be necessary.
Read moreFrogBlog
Let’s Talk Bartlett Kiln controllers!
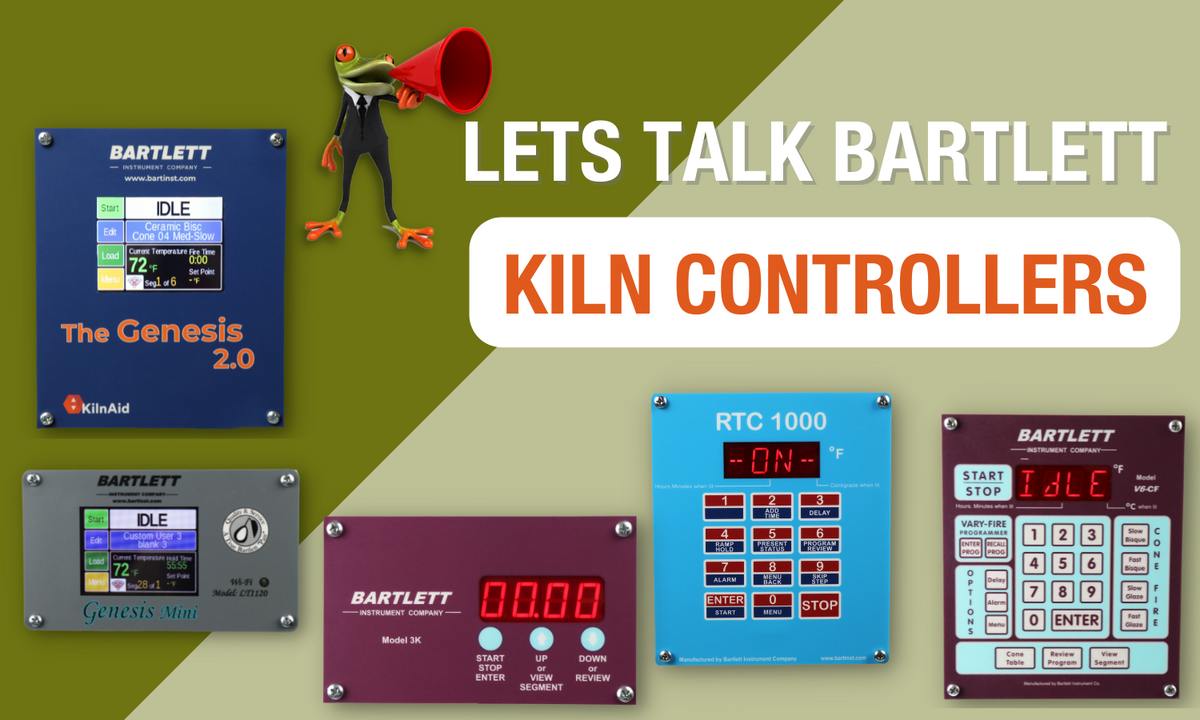
Let's talk Kiln Controllers, specifically Bartlett Controllers! Bartlett Instruments offers a variety of controllers that accommodate every type of kiln user. With so many kiln controllers in the market, it's hard to choose which one is going to be the right one for you. Different manufacturers offer different controllers, many of which are made by Bartlett Instruments. Some of the controllers are called by different names, but "underneath, a rose by any other name is still a Bartlett!"In previous Blog Posts we've covered other Kiln Controller's, made by different manufacturers, and their features and benefits. This article is the next in our series as we make our rounds to cover all the offerings. Here are the links to those articles: PART ONE: 3-Key Controller Tricks PART TWO: 12-Key Controller Tips & TricksThere’s A New Smart Controller In Town!We're here to help make your kiln controller choices a bit easier!! It's all about making sure YOU feel confident in your buying choices. Keep reading to get to know each controller. You'll learn about each one's features and which one's work the best for each type of firing. Want to know more? Let's Chat! Ready to find your perfect Bartlett Kiln Controller? Let's Start! Genesis 2.0 This is also know as the Sentinel Controller, it has a different face plate, but it's based on the Genesis 2.0. This modern and intuitive user platform with touch-screen technology for an effortless user interface. This controller can store up to 12 custom user programs with up to 32 segments per program and has the ability to make adjustment during a firing such as add segments, add temperature, and skip segments. Additionally, the easy-to-follow screen descriptions and graphical display of the firing process, allow the Genesis kiln controller to make firing kilns extremely straightforward. The Genesis 2.0 includes a larger processor for increased future capabilities as well as improved encryption for greater security. Check out the list of Genesis 2.0/Sentinel controller features: touch-screen technology for the user interface easy-to-follow screen descriptions different user-interface levels, which can be set to match the user’s firing knowledge graphical display of the firing process right at the controller Store up to 30 custom user programs Up to 32 segments per program Ability to make adjustment during a firing such as add segments, add temperature, and skip segments Built in diagnostics testing for use with a current sensor Alarm Error Codes WiFi enabled for easy software updating Register your Genesis on Bartlett's web site or mobile app (Kiln Aid) for remote monitoring of your kiln. Genesis Mini - Model 1120 Genesis Mini is like the little sibling to the Genesis 2.0 same modern and intuitive user platform with touch-screen technology for an effortless user interface in a smaller screen. This controller although small has a lot to give has the capability to fire any type of kiln firing you wish. This controller can store up to 30 custom user programs with up to 32 segments per program. Has the ability to make adjustments during a firing such as add segments, add temperature, and skip segments. Additionally, the easy-to-follow screen descriptions and graphical display of the firing process, allow this Genesis kiln controller to make firing kilns extremely straightforward. This controller will make firing kilns just a little bit easier in these ways: touch-screen technology for the user interface easy-to-follow screen descriptions different user-interface levels, which can be set to match the user’s firing knowledge graphical display of the firing process right at the controller Store up to 30 custom user programs Up to 32 segments per program Ability to make adjustment during a firing such as add segments, add temperature, and skip segments Built in diagnostics testing for use with a current sensor Alarm Error Codes WiFi enabled for easy software updating Register your Genesis on our web site or mobile app (Kiln Aid) for remote monitoring of your kiln Use for single zone kilns only V6-CF The V6-CF it's also know as the RampMaster, has a different face plate but is based on this controller. This is a 12 -key controller that is great for ceramic/pottery, glass or jewelry firing! With this 12-key cone-fire method, you can select 1 of the 4 firing speeds, your cone number and fire ceramics with as few as 6 key presses! The vary-fire method gives you the freedom to create up to six, 8-step user programs to fire your ceramics, crystalline glazes, glass or jewelry. Other features include delay start, preheat, alarm, cone adjustments, thermocouple adjustments, °F or °C operation, 16 segment program, and skip step. Advanced features of the V6-CF's include 3-zone control and KISS (kiln interface software system) for remote programming and data collection from a personal computer! Check out the list of V6-CF/RampMaster ll controller features: 24-key membrane switch keypad Selectable # of Zones (or Thermocouples), from 1 to 3 PID control algorithm Can store up to 6 Ramp/Hold programs (last fired program remains in memory) 8 Segments per program (each segment has a ramp rate to a temperature, and a soak period) , with an option to combine User programs 5 and 6 to get a 16 segment program Ability to "Skip-Step" (move from one segment to the next ramp) 4 speeds of Preset Conefire Programs, Slow Bisque, Fast Bisque, Slow Glaze, Fast Glaze Ability to perform a ConeFire to RampHold firing Ability to perform a delayed start of the kiln Alarm Error Codes Computer Interface Available RTC 1000 This controller has features that make it great for glass artists! The RTC 1000 has all of the same features as the old DTC controllers along with several improvements, including add time, back key, and recall user program to allow easier use of the controller. Check out the list of RTC 1000 controller features: Cone Fire 3 choices (Fast, Medium, and Slow) for Speed of a Cone Fire firing compared to 4 choices on a V6CF controller Preheat 6 Ramp/Hold Programs Edit-on-the-Fly Zone Control Thermocouple Offset Model 3K This low cost smaller kiln controller has only three keys, best to fire ceramics/pottery, uses a Type K thermocouple, and requires a 24V AC center-tap power transformer input. Other features of the Model 3K are: it's low cost, single set-point temperature controller module, and new, improved software! Keypad : 3 key No. of Thermocouples or Zones 1 Thermocouple Type: K, S, or R (N as a special order) Method of Control: Automatic adjusting PID Add Time (to current hold period): No ConeFire: Yes RampHold: Yes Temperature Scale: °F or °C Delay Start: Yes Alarm: Yes Error Codes: Yes Computer Interface Available: No Want to know more? Let's Chat! ***Disclaimer: The opinions and content presented are KilnFrog, LLC's alone and are not generated, influenced, or produced by Bartlett Instruments or any kiln manufacturer. We thank Bartlett Instruments for the use of their name and product images in this piece.
Read more
Ceramic Kilns: What buyers need to know
When you are looking for the perfect kiln, you might think there is one out there that does it all, but kilns are made for specific purposes. The perfect ceramic or pottery kiln might be a poor choice for an enamel artist. The best knife oven would not necessarily be great for a glass fuser. In the next few weeks, we are going to take a look at several different categories of kilns and discuss what we think are important features to look for when you are deciding on your next kiln. Clay remains one of the busiest corners of the craft world, as recent pottery participation figures confirm. Let’s start with kilns for clay artists! Let’s Talk Ceramic/Pottery Kilns: Firing Temperature The first thing you should look for is firing temperature. First, we should point out that clay people use a measurement of heat called “cones”. For over 100 years, ceramic artists have used the pyramid shaped, ceramic pyrometric cones to measure heat in kilns. The cones are made from very carefully controlled clay compositions and they will bend at a specified temperature. We can thank Dr. Edward Orton Jr. for coming up with this very easy and accurate way to measure heat in the kiln environment. Of course, today we use digital controllers to keep track of the heat work in our kilns, but we still use the same cone ranges specified by Orton when referring to the various temperatures at which our clays and glazes reach maturity. So, which cone do you fire to in order to get your clay to maturity? Do you want the flexibility to fire all the way to cone 10, or are you strictly a low fire clay kind of guy or gal? Firing temperature is important for every kiln type, but in ceramic kilns there are many possibilities, and you don’t want to limit your creativity by purchasing a kiln that will only fire low fire clays if that isn’t your thing. Here are the temperature ranges that you should be familiar with: Low Fire – cone 09 to cone 1, or 1700º F to 2100º F. Low fire clays have the widest range of maturing temperatures, so knowing your preferred clay is important here. Mid Fire – cone 5 to cone 6, or 2167º F to 2232º F. High Fire – cone 8 to cone 10, or 2280º F to 2345º F. Most ceramic kilns will either be rated to 2100ºF (cone 1), 2300ºF (cone 8), or 2350º F (cone 10), so choose a kiln that is right for your clay of choice. (If you’re not sure which clay you’re planning on using, err on the side of a cone 10 kiln. This will give you the most flexibility.) Heat Source Now that you have your firing temperature satisfied, be sure you have the right heat source. Ceramic kilns will almost always have side firing elements. If you are looking at a front-loading kiln, you might want to include door elements so that you get heat evenly distributed coming from all sides. Most smaller front-loading kilns do a really good job of heat distribution with only the elements in the three stationary walls, but the larger front-loaders really do benefit from door elements. Round or octagonal kilns benefit from the perfect, even heat distribution that clay needs for a good firing. Power Supply Make sure you have the right power supply for your kiln. This is always important, but since ceramic and pottery kilns usually fire pretty hot, you will most likely need to have a 240v power supply. Always consult your electrician to see what size breaker you need for the kiln that you have your heart set on. There are a few 120v ceramic kilns out there, but they are very small, and typically are used to test glazes, or for jewelry projects like beads and barrettes. To get a large volume of space up to ceramic firing temperature requires more juice, so you are going to want to be sure you have an adequate power source for the kiln that you purchase. A good way to think of this is more space=more power. 120v and 240v kilns will have different power cords according to the amperage rating of the kiln. Again, consult your electrician once you have your kiln selected to make sure that the circuit for your kiln is the correct voltage, has the proper receptacle, and has the correctly sized breaker for the amount of power the kiln is pulling. For very large kilns, you might need a direct wired connection. You can find diagrams of the various outlet configurations here: https://kilnfrog.com/pages/what-type-of-plug-do-i-need Top Loading vs Front Loading Most ceramic and pottery kilns are round or octagonal in shape and load from the top. This is a very traditional design for ceramic kilns, but there is another option! A front-loading ceramic kiln makes getting larger pieces in and out of the kiln, especially in greenware, much easier! Front-loading ceramic kilns are typically larger and very well suited for the production ceramicist. Even if you are a hobbyist, the ergonomics of a front load kiln might be something you’d prefer. Round, deep kilns are harder on the back to load and unload, and if your height challenged this can be even more difficult. Plus, the wider the kiln, the heavier the lid can be, making it an even tougher job. The trade-offs between the two loading styles run deeper than lid weight alone. Shape Kiln shape is another thing to consider when looking for a ceramic kiln. As I mentioned earlier, the traditional ceramic kiln is a round or octagonal shape that is tall enough for at least two or three layers of shelves. That being said, there are some great square top-loading and front-loading ceramic kilns out there. When you are considering what is the best fit for you it might be a good idea to lay out a typical load of your largest sized pieces and see what shape works best to utilize as much of your kiln space as possible. To Vent or Not To Vent… what are the options? Now we all know that kilns need to have adequate ventilation in their environment, but ceramic and pottery kilns also benefit greatly from interior ventilation systems. Usually referred to as a VentMaster, these internal vent systems give you many benefits in your firings: In the greenware to bisque stage, an internal vent system helps to get the excess moisture out of the kiln more quickly. During the glaze firing, internal vent systems get rid of excess moisture during the first portion of the firing, but also help your glazes to mature properly and develop more intense colors, especially in the red and yellow hues. If you are using glazes that have any toxic elements, this internal venting is essential to keeping your work environment safe. All of the noxious fumes inside the kiln are exhausted outside where they dissipate quickly and are not trapped inside with you! Vent systems typically have a vent hole in the floor of the kiln where the vent attaches. The vent then pulls a small amount of air through the body of the kiln via a vacuum effect and then exhausts that air through an exhaust vent hose which you direct away and out of your firing area. This could be done through an exterior wall or through a series of hoses through a window, or out a doorway, or even into another wider, better-ventilated space. Paragon and Olympic have the option of supplying a 240v Auxiliary Output Plug (AOP) on their controllers that will allow you to program when to turn your VentMaster on and off during your firing with the 12-key and smart touch controllers. In order to take advantage of this feature, you should specify the AOP option and the 240v VentMaster. Otherwise, the 120V VentMaster is simply plugged into a regular household outlet and turned on and off manually. Kiln Furniture Kiln furniture is an essential part of any kiln, but with ceramic and pottery kilns you typically have enough shelves and posts for several layers in your ceramic kiln. When we say furniture, we don’t mean sofas and chairs. Furniture is an industry term for stuff in the chamber to hold up clay ware. It means the kiln shelves, the posts, the stilts, the tile holders, or anything you need to support the items you are firing. All of our ceramic kilns have available shelf/furniture kits that include everything you need to set up multiple layers of pottery in your kiln, so don’t forget to add the furniture kit to your cart when selecting a kiln. Size And then there is size, and it does matter! Many people will tell you to buy the largest kiln you can afford, and there is a lot of wisdom in that train of thought. However, you don’t want to get a kiln that is so large that it takes you weeks to fill it up. That could get a bit frustrating if you are the type of person that loves to see results quickly. Of course, as you grow your skills as an artist, you might easily grow into a larger kiln. Speaking from personal experience, it takes a lot more planning to arrange work in a kiln when you work is 18-20 inches tall than when it was 6 or 7 inches tall. That’s where those half shelves that you see in the furniture kits come in handy! My last load of pottery had one half of my 22” tall kiln loaded with just two 18” vases on the bottom shelf, but the other side had three layers of shorter vases and bowls stacked up. Location, Location, Location Lastly, it is always good to keep in mind where you will put your new kiln when it arrives. Remember that ceramic and pottery kilns are usually reaching temperatures in the 2200-2350º F range and you should have a minimum of 12-18” of clearance from any combustible materials around your kiln. You should also have plenty of air circulation and ventilation in the space where you kiln will be located. It’s a great idea to have a portable fan that you can direct on your controller box to help keep it cool and happy. Also, think about where you will store your shelving, posts, and other kiln furniture in the vicinity of the kiln. Make room for the essentials like your shelf primer too! Hopefully this information will help in your decision making when considering a new ceramic or pottery kiln. If you need to talk things out, give us a call or shoot us an email. We are always happy to help you talk through your options and help you find the best fit for your needs.
Read more
Learning to Read your Relay
No matter what kind of kiln or oven you use, unless you have mercury or solid state relays, it's a fact of life that relays need to be changed. But, before you replace the mechanical relay of a digital kiln, it is very important that you learn how to read the relay label printed on the side to be sure you are installing the correct one. The label is confusing until you spend a little time studying it. On the label, find the voltage of the relay coil, which is the electromagnet inside the relay. When the electromagnet receives a signal from the controller, terminals inside the relay come together. The terminals make a clicking noise and turn on the heating elements. The voltage of the coil is printed on the relay near a symbol of the coil. In the sample relays shown, the coil is symbolized by a rectangle with a diagonal line. The coil in the top left relay is 12 volts DC, which is the most commonly used kiln relay. The coil in the bottom left relay is 240 volts AC. The coil in the relay on the right is 200 - 240 volts AC (for 208 volt kilns). The 12 volt DC coil is used in relays that are turned on by a digital controller. The 240 volt AC coil is used for relays that are activated by an infinite control switch instead of a digital controller. DC means direct current, which comes from the controller to the relays. The symbol for DC is a horizontal solid line over a broken line. AC is the current from the wall outlet and is symbolized by a wavy line. The relay is rated for a level of current. The current rating of the relay does not mean it requires that much current to operate but, is the maximum safe level that the relay can handle.
Read more
PART TWO: 12-Key Controller Tips & Tricks
Happy Firing!! Now, a post for all you 12-button controller owners. Here are a few tricks that are good to know to help you be in better control of your firings! These tricks should apply to all of the following controllers! Changing a Target Temperature During a Firing - If the kiln is firing and you need to modify the current ramp target temperature (or hold time), Press the #4 USER PROG key. The controller will display the current target temperature and setting. Use the numeric keypad to change the temperature value and press ENTER. The controller will next display the current ramp hold time and setting. This too can be modified if necessary. Press ENTER again to exit the editing mode. Adding Time to a Hold - If the kiln is firing and you need to add time to the current ramp hold time, press the #2 ADD TIME key. Five (5) minutes will be added to the hold time each time the key is pressed. If the firing is in the first ramp, you can only edit the first ramp hold time. To edit the second ramp hold time, wait until the firing has progressed into the second ramp. Skip Step - To end a hold before the time has expired, use the Skip Step function to advance to the next ramp. Press the #9 SKIP key to view the next ramp and press ENTER. Threshold Alarm - To sound an audible alarm when the controller reaches a temperature, press the #7 ALARM key. ALAR shows in the display alternating with the alarm temperature. You can use the numerical keypad to enter a new alarm temperature or press Enter to keep the existing value. Setting the value to zero disables the alarm feature. When the kiln reaches the alarm temperature, the display will indicate ALAR and the buzzer will sound. Silence the alarm by pressing any key except STOP. Pressing STOP ends the firing. You can program the alarm before you start the firing or during the firing. Hopefully, these few tips will help your work be the best it can be! If you are interested in learning more about the different controller options that are available check out our controller option videos here! Your Kiln Gal, Gail
Read more
PART ONE: 3-Key Controller Tricks
Everyday prospective buyers ask me which type of controller is better; the 3-key or the 12-key. What I tell them is "There is no better... it reallly comes down to what you have or can afford." A 3-key controller can do almost everything a 12-key can do, but it just takes longer to get the programming done. And, it doesn't matter if it's a Paragon, Olympic, Evenheat or Jen-Ken kiln... all 3-key controllers work the same way. If your impatient or easily distracted, like me, a 12-key might be the right choice for you. Either way the digital controller, either 3-key or 12-key can be your friend if your know these simple tricks. So, this week I'll share 3-key controller tricks you might not know about. 3-Key Controllers - COOL OPTIONS THAT ARE HIDDEN! During an active firing, the INCREASE button will activate an options menu and scroll through the available options with each button press. These options allow you to make adjustments to the firing program without stopping the firing. The available options follow... SKIP STEP - During an active heating, cooling or hold time, it is possible to skip ahead to the next program step. Press the INCREASE button to display the skip step prompt SStP. Then press the PROGRAM button to display the current ramp or hold segment. Press the PROGRAM button again to initiate the skip and the controller display returns to the normal firing mode. If the DECREASE button is pressed, the skip step function is canceled and the controller display returns to the normal firing mode.The skip function can be used to end a hold time early or to skip from any heating/cooling step to the next heating/cooling step. The skip function does nothing during the final program step. To end a final program step, simply press STOP. ADD MORE HOLD TIME - During an active heating, cooling or hold time, it is possible to add more hold time to the current program step. Press the INCREASE button until the hold time prompt HLdt is displayed. Then Press the PROGRAM button to display the current hold time. Press the INCREASE button to add five (5) minute increments to the original hold time. Then press the PROGRAM button to return to the normal firing mode. If the DECREASE button is pressed while the HLDT prompt is displayed, the controller display returns to the normal firing mode. CHANGE HEATING OR COOLING TEMPS - During an active heating, cooling or hold time, it is possible to change the heating or cooling temperature of the current program step. Press the INCREASE button until the change temperature prompt CHGT is displayed. Then press the PROGRAM button to display the current temperature setting. Adjust the temperature setting with the INCREASE or DECREASE buttons. Then press the PROGRAM button to return to the normal firing mode. If the DECREASE button is pressed while the CHGT prompt is displayed, the controller display returns to the normal firing mode. THRESHOLD ALARM- During the firing, it is possible to set an audible alarm and display alarm for when the actual temperature reaches a specified value. The buzzer will sound (for 30 seconds) and the display will show the alarm code ALAR.To set the alarm, press the INCREASE button during the active firing until the alarm prompt ALAR is displayed. Then press the PROGRAM button to display the current alarm temperature setting. Adjust the temperature setting with the INCREASE or DECREASE buttons. Then press the PROGRAM button to return to the normal firing mode. If the DECREASE button is pressed while the ALAr prompt is displayed, the controller display returns to the normal firing mode. The alarm is disabled (turned off) when the alarm value is set to 32°F (0ºC). The alarm value can be reset or changed many times during a single firing. To silence an active alarm, simply press any button. I hope these few tricks up your sleeves with help you get even more out of firing your kilns! Stay tuned for next week's PART TWO: 12-KEY CONTROLLER MAGIC! If you are interested in learning more about the different controller options that are available check out our controller option videos here! Your Kiln Gal, Gail
Read more