Evenheat Kilns
Evenheat Kilns & Ovens
Firing
Glaze
Glaze Firing
Jen-Ken Kilns
Kiln Academy
Kiln Accessories
Kiln help
Kiln Parts
Kiln Repair Directory
Kiln Repairs
Kiln Tips
Kiln Troubleshooting
maintenance
Olympic Kilns
Paragon Kilns
Slumping
Troubleshooting
Feeling Like I'm on Grey's Anatomy... Kiln Surgery... STAT!
There's a sinking feeling that I get in my gut when one of my kilns behaves oddly. It's akin to the car making weird noises as you are driving down the highway. Thoughts of dread begin to fill your mind and you start to concoct scenarios of doom. Mainly, "ON NO, I HAVE TO OPEN THE CONTROLLER BOX!"
 It's funny because I've owned a lot of kilns over the last 14 years and changed a lot of relays, transformers, thermocouples, etc., but still that feeling of dread comes over me as though it was my first time "opening the box." It's like a big mystery. What's in there? What's it going to look like? ...and the biggest question of all.... WILL I SCREW IT UP? You'd think that I'd approach this with confidence and bravado thinking, "I've done this a million times. I've got this!" But, sadly, NO!
Anyway, if you feel the same way too, know you are not alone. The inside of the "box" is intimidating. Although it's pretty simple once you know what all of the wires are for and how the electricity needs to move, it's still a little daunting. So here's my story of the week regarding my kiln surgery.
 I have a 36" Profusion Fiber kiln. I love her, and her name is Jenny! (Yeah, I know I'm a weirdo.) I loaded some simple 2 layer plate tiles into the kiln for an easy full fuse and got a FTL error. The glass never got fired at all and the kiln only went to 600F. So why the FTL? (That's failure to cool, for those of you who don't know all the error codes.) Apparently, you get a FTL code after a FTH (failure to heat) code. Now that seems illogical, but that rant is for another blog. So my task was to figure out why the kiln wasn't heating. No heat = no fusing = no fun for me!
There are only a few reasons why a kiln won't heat; dead or stuck relay(s), broken or fried element, not enough current/volts getting to the kiln, etc. The thermocouple was telling me the correct temps, so we could rule that out easily. I'm not as religious about changing relays as I should be on this kiln. I changed them all out exactly 3 years ago. So, it clearly was time! Luckily, I'm not a hypocrite! I did have a stash of relays that was reserved for this event, so I was ready when the time came. (I might be lazy, but I'm not a hypocrite!) So I set aside yesterday afternoon for this planned outpatient kiln surgery!
I took out my drill with the 1/4" nut driver attachment, my phillips head bit, and my long nose pliers. I unplugged the kiln and set a small bowl next to my chair. The bowl is for all the screw, nuts, and parts that come off, and will need to go back onto the kiln. It just helps keep things in one place and makes sure things don't roll away and escape from you. (I learned this from experience of not doing the bowl thing and being on my hands and knee on the floor looking for a damn screw.) I pull up a comfy low chair and found a stool to rest the box on since It was still going to be attached to the kiln. NOW I AM READY FOR SURGERY! All I needed was the trippy Grey's Anatomy music and someone telling me, go for it!

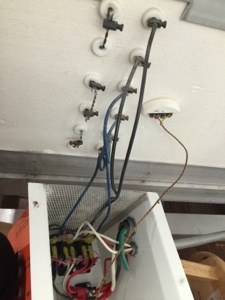 As you can tell from these pictures, there is A LOT going on in there. The kiln has 4 relays with 4 element connections, power jumps from one relay to the next, connections to the pilot lights, etc. There are 6 prongs on each of the 4 relays, and each prong has something attached to it. That's 24 connections to take off and reconnect correctly, and in the right order. That wouldn't be so bad except that this all has to be done in a tiny space. I'm not the largest lady in town, but I'm not small and delicate either. My hands are normal size, but in that box I felt like my hands were baseball mitts. Each relay is color coded to an element. So the red wires go to one relay, the whites, the blacks, and the blues, each to their own relay. That's really helpful so that you know you've got it all correct. Of course that escaped me the first time I did this, but you learn.
 Each relay is held in place by 2 bolts, each with their corresponding nut. That's a challenge, removing the relay from its spot, then disconnecting all of the crimped connections, then attaching all the connections correctly to the new relay, and then bolting the new relay back in place securely. That's what you do, just four times, in a small space, bent over, with reading glasses on, while you struggle to hold the long nosed pliers that are wiggling the tightly crime connectors on and off. See.... it's simple... a breeze.. ARE YOU KIDDING ME?
The TRUTH is that none of this in mentally taxing. I didn't need special knowledge, JUST NERVE! I had to remember that this was just a giant toaster, and I am a resourceful girl! Yes, I started out intimidated, but that soon gave way to a wave of confidence and accomplishment. My last step was to take a picture of the inside of the box and send it to the folks that built the kiln to assure I hadn't missed anything. They got back to me quickly and pointed out one mistake, which was easily fixed in 15 seconds. The kiln companies are there to help, so utilize that help. NOW I AM READY TO GO!
HERE'S WHAT I LEARED, THAT YOU CAN LEARN FROM TOO...
-
Fear is the enemy, not the relays!
-
Have the right tools and get them together in one place.
-
Get a stash of relays so that you will be ready when the time comes.
-
Schedule a quiet, uninterrupted "appointment" time with yourself to do this task.
-
Go slowly and take a break if you need it.
-
DO NOT wait until the kiln doesn't fire, or do this the night before a show.
-
Ask for help from your kiln manufacturer.
-
Reward yourself for job well done!
Good luck! If I can do it, you can too!
Your Kiln Gal,
Gail
Some important kiln parts:


Leave a comment